Edited to Add Checklists at the end of the post.

I started with this skirt a couple of weeks ago and had a hard time putting it together only because I am so visual and all the directions I got were in paragraph form. It puts me in a bit of a panic to have to read a paragraph and try to work with fabric.
Basically, this whole 1912 sewing project is one big exercise in getting over my self-imposed hurdles, which I’m a huge fan of. “Get uncomfortable” is what I say. It’s not for everyone but it works for me.
You might have already seen progress on this skirt as I twisted and pinned the soutache braid. Here are some more photos of my process.
First, sizing.
The skirt pattern says that the skirt is for a 25″ waist. Even in a corset, I’m not a 25″ waist. I usually check the actual measurements of a pattern but for some reason (read: I was eager), I just added the needed inches to the sides of the skirt so that the front piece would be in the same place as the pattern drawing.
As it turns out, I added too many inches. At this point, I’m not going to fret about it and just make it work.
Before finishing the waist with the grossgrain, I played with gathering the extra fullness. In the picture below, I achieved what I think is a more Edwardian look, having the fullness gathered at the sides by the dart.
The picture following that one, I believe I got more of the Titanic era look, a slimmer hip look. For that look, I gathered the extra fabric in the back, where the side piece and the back meet. I could have re-cut the side piece but chose not to.
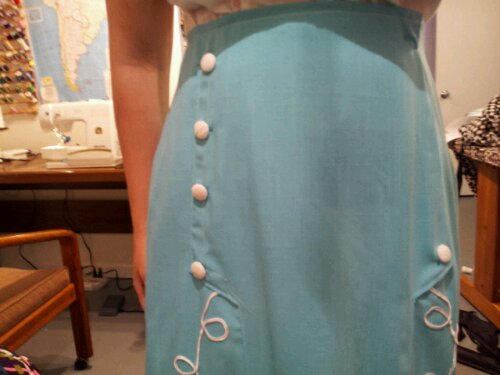
The skirt itself comes together in a straight forward way. It’s the details that add all the magic. You add the soutache braid along the fronts of the side pieces before you even sew any seams, which makes the construction feel like it comes together quickly, as far as I’m concerned.
I still have to add all the buttons. In the photo below, they are merely pinned to the front. I did fabric covered buttons, so to echo both the color and the texture of the soutache climbing up the skirt. (Can you tell I’m giddy about the soutache??)

Despite not adding the stiffener or boning to the front of the skirt, I like the way it all holds together. It’ll be a whole different thing to see me seated, even with all the undergarments.

Don’t know if you can see, but I also did the topstitching in a white thread to bring it all together.
I had no issues with fitting this skirt, though I don’t have issues fitting skirts usually. Just wait until I get into the blouses and dresses. I will definitely have loads of alterations there. I do recommend that you measure the skirt waist on the pattern first before you add any more to it. I also highly recommend that you cut off the seam allowance before you start alterations. Then you can trace the stitching line with a tracing wheel and tracing paper as well as tracing a cutting line. You’ll be glad you did it.
I’ll be scouring second hand stores to find Titanic era-ish shoes, after which I’ll be able to hem this bad boy.
Pattern Review Checklist:
- Pattern Description: A Ladies Skirt (#E0162) with side gores and a 25″ waist.
- Pattern Sizing: One size meant for 25″ waist, but it has a lot of ease.
- Did it look like the photo/drawing on the pattern envelope once you were done sewing it? I think it did.
- Were the instructions easy to follow? The kick pleat in the back could use more description but other than that, it’s really easy, once you get the hang of joining patterns by numbers.
- What did you particularly like or dislike about the pattern? I love the flow of this skirt. I made it to wear for a 1912 costume but I’m could totally wear it daily. It’s very comfortable. I might raise them hem in the back. It has a gentle sloping in the back hem, making the back longer than the front.
- Fabric Used: I used a linen blend for the skirt. I also used soutache cord and covered buttons with a ribbed poly white fabric.
- Pattern alterations or any design changes you made: I added 10″, divided between the side gores but other than that, I kept to the pattern.
- Would you recommend this pattern to others? I do recommend this pattern.
- Conclusion: I loved working this pattern. It’s another 1912 pattern that easily lends itself to simplicity with or without a lot of detailing.
VPLL Checklist
- Pattern Name: Skirt #0162
- Sewer’s Skill Level: Intermediate
- Pattern Rating: 5-I LOVED IT! and why? It’s easy to construct and you can do lots of work on the soutache or just apply some bought ribbon for the front. The buttons you can also spruce up or leave store bough
- What skill level would someone need to sew this pattern and why? Intermediate, unless there were more detailed instructions on the waist band and the kick pleats.
- Were the instructions easy to follow? If not, what needs to be changed? I would have appreciated more details on how to do the back kick pleats. I figured it out but I don’t know if a beginner would.
- How was the fit/sizing? Did it correspond to what you thought? I thought I would need to add a lot more for my waist but as it turned out I added too much. The skirt says it’s a 25″ waist (my waist is 35″) so I added 10 inches but found that to be too much. I made a second skirt for a friend who has a 31″ waist and adding enough for her waist was too much, too. The ease in this skirt is more than 25″. Just make sure you measure the pattern flat before you alter it. I assumed 25″ was the actual measurement. My bad.
- Did you make any pattern alterations? If so, what alterations did you make? Where they fit or design alterations? I only added the 10″- by slash and spread method but only on the side gores. I wanted the front to stay intact, design wise. It worked.


Wow, you’ve done such a nice job. I love the color combination and the soutache is fabulous. I can see your wearing a pretty lovely slip with it as well 😉 I wonder if the skirt would hang as nicely without the ruffle of the slip?
I also have a boring question about what you use for tracing paper and wheel. My only attempts have been with the non-wax paper which came in a package with white and blue options and I used an old very spikey tracing wheel. It was not as clear as I would have liked and wondering if my wheel was the wrong kind or perhaps the waxed paper is better.
Good luck in the shops, would love to see your ‘new’ shoes!
I use a double tracing wheel, like this one: http://www.amazon.com/Clover-487-W-Double-Tracing/dp/B00292BPII and I use the tracing paper I can get at Joanns- nothing special. I also use an old tracing wheel that my mother in law gave me. It works just as well. I do press firmly and work on a table. I don’t know if that helps a lot. Or at all. 🙂 Thanks for commenting. I really appreciate it. I’ll definitely be posting about my shoes.
What a wonderful job and pretty color! I really like that you have the white buttons to match the trim – it’s a nice graphic pop. =)
Thanks Brooke.
Work is very beautiful and hard, you have surprised many in the beauty of design and brilliant ideas, as we have become accustomed to your rare beauty, the skirt is very beautiful and elegant, while checking the details of the idea, and the color makes it more elegant and fashionable in the days of spring coming, you are amazing
Thanks for the nice comment. I’m always amazed at what I can do. 🙂 It’s as if plunging into the work makes it possible.
check out American Duchess web site for shoes. A little pricey, but the white pair would be a perfect complement to your fabulous project. congrats